How to download,install,run and create database in wamp server
How To Install And Configure Wamp Server
Follow these simple steps
1. Download Wamp Server
2. Install Wamp Server
3. Run Wamp Server
4. Create Database
Step 1. To Download wamp server click this link :- http://www.wampserver.com/en/download.php
after clicking wamp server official page appears like this
You will have the option to choose 64 bit or 32 bit version. before downloading check your system configuration. after finding click and download.
Step 2. To Install Wamp Server find your downloaded wamp file just doubble click. wamp installation window opens. now like any other installation press next , next , next and Insatall . now your installation done. to check the directory go to c\wamp
Step 3. To run wamp server click windows start button type wamp in search and double click. now on your right side taskbar w icon appears if icon is green means wamp server starts successfully.
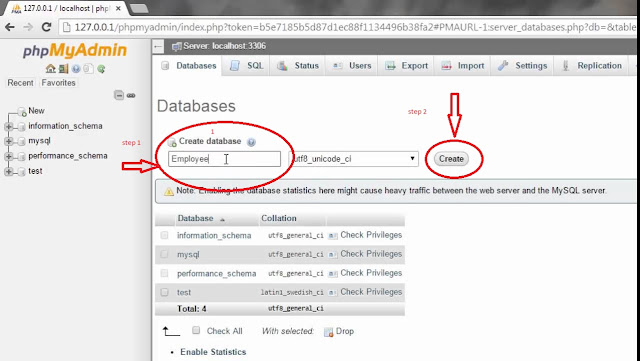
step 4. To create database firstly you type http://localhost/phpmyadmin/ in your browser url hit enter.
now you are on phpmyadmin dashboard. on top of you see red circle marked click on database.
give your database name for your project on circle 1 and then click on create. thats all you are done.
if you find this article helpful then share with your friends neighbours.
Subscribe to:
Post Comments
(
Atom
)


No comments :
Post a Comment